If you haven't, go read the first chapter here. It'll get you all set up for this chapter.
In this tutorial, you'll learn how to navigate the left third of MagicaVoxel 0.98. I'm going to have to split this chapter into three parts, since it's much too big for one chapter.
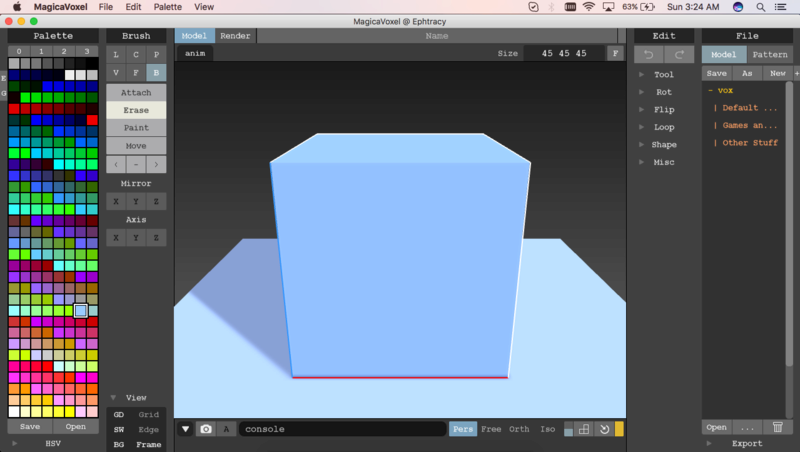
Let's start by opening it up. When it loads, you should be greeted with this screen.
Menu Bar
We'll explore the screen from top left to bottom right, starting with the menu bar. It should look the same no matter what operating system you are using.
There are four buttons, each with its own submenu.
File

----------
-New: makes a new file
-Duplicate: makes a copy of the current file
----------
-Save: saves the current file
-Save As: saves the current file as a copy
----------
-Open: opens another file
-Import: imports a file
----------
-Screenshot: takes a picture of the model view
-Bake: bakes lighting and effects into the model
-Export: Exports the model (files can be exported as .vox, .slab, .xraw, .qb, .obj, .ply, .mc, .2d, and .iso
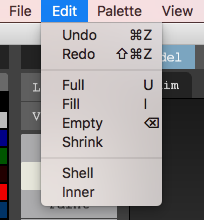
Edit
----------
Undo: undoes the last action
Redo: redoes the previous action
----------
Full: fills the model area
Fill: does nothing at the moment
Empty: empties the model area
Shrink: shrinks the model area to the size of the current model
----------
Shell: deletes everything not visible from the outside
Inner: does nothing at the moment
Palette

----------
New: makes a new palette
Open: opens a palette
Save: saves the current palette
View
----------
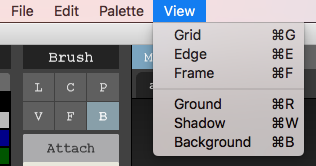
Grid: turns on/off the grid
Edge: turns on/off edges
Frame: turns on/off the model area frame
----------
Ground: turns on/off the ground
Shadow: turns on/off shadows
Background: turns on/off the background
Palette Panel
The Palette Panel is where you can edit palettes and change the current color you are using. Each palette is made up of 255 colors. The top right box (the one you can't click) is unused. There are 2 default palettes to choose from inside of the program, and 2 blank ones for you to make your own. Go to Palette>Open in the menu bar to open a saved palette.


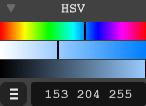
To edit a new or existing palette, there is an HSV tab at the bottom, which you can click to expand. It features a hue slider and brightness slider, as well as a RGB input area. If you click on the three lines, the HSV panel turns into an RGB panel, which can be more useful for advanced users.

You may have noticed the "E" and "G" tabs on the left side of the panel. The "E" tab is for choosing the edge color, while the "G" tab is for choosing the ground color.
Brush Panel

----------
There are 6 buttons in the first section of the Brush Panel, each corresponds to a certain brush mode.
L (line mode): draws voxels in a line
C (center mode): draws out from where you first clicked your mouse
P (pattern mode): makes a pattern based on present voxels
V (voxel mode): draws voxels wherever you click
F (face mode): adds a layer to the voxel surface clicked
B (box mode): draws a box from the starting X,Y,Z coordinates to the end X,Y,Z coordinates
----------
The second section of the Brush Panel hold the action buttons.
Attach: places voxels based on brush mode
Erase: removes voxels based on brush mode
Paint: paints voxels based on brush mode
Move: moves voxels along an axis (hold shift to move freely)
<: picks a voxel color from the model (like an eye dropper)
-: removes all voxels of a certain color
>: replaces all voxels of a given color to a new color
----------
The third and fourth sections go together.
Mirror X: mirrors along the X axis
Mirror Y: mirrors along the Y axis
Mirror Z: mirrors along the Z axis
Axis X/Y/Z: basically Face Mode for an entire plane
----------
I haven't experimented enough with the 5th section to know enough about what it does. Updates to come.
View Panel
The View Panel is basically the View Menu in the Menu Bar.

That's all there is for the Menu Bar and left third of MagicaVoxel. Chapter 3 will be arriving soon.
In this tutorial, you'll learn how to navigate the left third of MagicaVoxel 0.98. I'm going to have to split this chapter into three parts, since it's much too big for one chapter.
Let's start by opening it up. When it loads, you should be greeted with this screen.

Menu Bar
We'll explore the screen from top left to bottom right, starting with the menu bar. It should look the same no matter what operating system you are using.
There are four buttons, each with its own submenu.
File

----------
-New: makes a new file
-Duplicate: makes a copy of the current file
----------
-Save: saves the current file
-Save As: saves the current file as a copy
----------
-Open: opens another file
-Import: imports a file
----------
-Screenshot: takes a picture of the model view
-Bake: bakes lighting and effects into the model
-Export: Exports the model (files can be exported as .vox, .slab, .xraw, .qb, .obj, .ply, .mc, .2d, and .iso
Edit

----------
Undo: undoes the last action
Redo: redoes the previous action
----------
Full: fills the model area
Fill: does nothing at the moment
Empty: empties the model area
Shrink: shrinks the model area to the size of the current model
----------
Shell: deletes everything not visible from the outside
Inner: does nothing at the moment
Palette

----------
New: makes a new palette
Open: opens a palette
Save: saves the current palette
View

----------
Grid: turns on/off the grid
Edge: turns on/off edges
Frame: turns on/off the model area frame
----------
Ground: turns on/off the ground
Shadow: turns on/off shadows
Background: turns on/off the background
Palette Panel
The Palette Panel is where you can edit palettes and change the current color you are using. Each palette is made up of 255 colors. The top right box (the one you can't click) is unused. There are 2 default palettes to choose from inside of the program, and 2 blank ones for you to make your own. Go to Palette>Open in the menu bar to open a saved palette.


To edit a new or existing palette, there is an HSV tab at the bottom, which you can click to expand. It features a hue slider and brightness slider, as well as a RGB input area. If you click on the three lines, the HSV panel turns into an RGB panel, which can be more useful for advanced users.


You may have noticed the "E" and "G" tabs on the left side of the panel. The "E" tab is for choosing the edge color, while the "G" tab is for choosing the ground color.
Brush Panel

----------
There are 6 buttons in the first section of the Brush Panel, each corresponds to a certain brush mode.
L (line mode): draws voxels in a line
C (center mode): draws out from where you first clicked your mouse
P (pattern mode): makes a pattern based on present voxels
V (voxel mode): draws voxels wherever you click
F (face mode): adds a layer to the voxel surface clicked
B (box mode): draws a box from the starting X,Y,Z coordinates to the end X,Y,Z coordinates
----------
The second section of the Brush Panel hold the action buttons.
Attach: places voxels based on brush mode
Erase: removes voxels based on brush mode
Paint: paints voxels based on brush mode
Move: moves voxels along an axis (hold shift to move freely)
<: picks a voxel color from the model (like an eye dropper)
-: removes all voxels of a certain color
>: replaces all voxels of a given color to a new color
----------
The third and fourth sections go together.
Mirror X: mirrors along the X axis
Mirror Y: mirrors along the Y axis
Mirror Z: mirrors along the Z axis
Axis X/Y/Z: basically Face Mode for an entire plane
----------
I haven't experimented enough with the 5th section to know enough about what it does. Updates to come.
View Panel
The View Panel is basically the View Menu in the Menu Bar.

That's all there is for the Menu Bar and left third of MagicaVoxel. Chapter 3 will be arriving soon.


